The purpose of this blog is to explain how to modify and swap PS2 parts between different PS2 model revisions that have 8 case housing screws.
This is useful if you have PS2 parts from different model revisions but not enough to make a complete matching parts model PS2.
NOTE: Not including are JAP, US, EU and AU launch model PS2s that have 10 housing screws.
NOTE: ALTHOUGH I HAVE ACCESS TO AFEW DIFFERENT PS2 MODEL REVISIONS I DON'T HAVE ACCESS TO EVERY SINGLE ONE SO THERE IS A POSSIBILITY THAT THERE MAY STILL BE UNLISTED INCOMPATIBILITY ISSUES.
NOTE: PS2 motherboards are paired to specific laser model. If you change your PS2 disc drive the laser within the replacement disc drive might be a different model. If this is the case you must use this homebrew app to pair your PS2 to a different model laser.
BUILDING UP A SCPH-30xxx - SCPH-390xx, GH-015 to GH-022 MOTHERBOARD PS2
NOTE: SCPH-350xx R - SCPH-390xx PS2 All parts should be swap-able without issue.
FRONT PANEL - BUTTONS / LEDs / IR SENSOR
NOTE: IR remote function will be unavailable if you proceed with the listed disc drive swap.
SCPH-50xxx PS2s use a 12 pin 0.5mm pitch connector and SCPH-300xx R - SCPH-390xx PS2s use a 7 pin 1mm pitch connector. I have designed a custom PCB to convert the different connectors to the other kind. I will be selling these if there is anyone interested.
DISC DRIVE
NOTE: You must use the top housing from a SCPH-50xxx because the front panel switches and leds are mounted on the disc drive.
Drive Modification:
NOTE: If you have and use the top metal chassis with the heat sinks from SCPH-50xxx motherboards you can skip the following modification.
There is a small bit of plastic on the disc drive that needs to be trimmed on SCPH-50xxx PS2 disc drives, otherwise the disc drive will collide with part of the top metal chassis with the heat sinks from SCPH-300xx - SCPH-390xx PS2's . Use a dremel to cut the shape like the in the after picture.
Before.
CHASSIS
Disc Drive Modification:
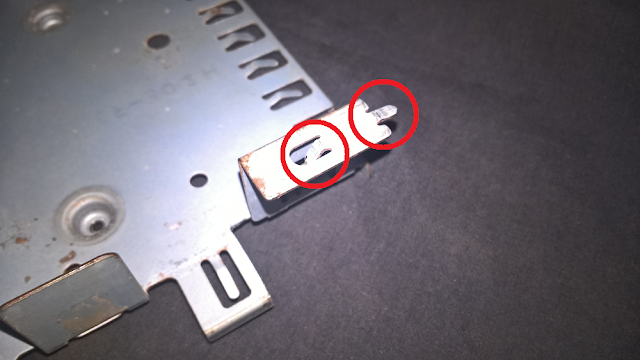
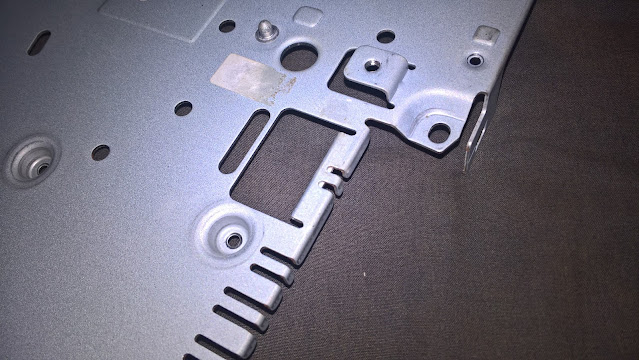
If you use the metal chassis from a SCPH-3xxxx PS2 but the disc drive from a SCPH-5xxxx the bottom chassis rear has a small jut out you need to bend it so that it no longer juts out. Otherwise it will collide with the SCPH-5xxxx disc drive plastic frame.
NOTE: Not all chassis revisions have this jut out.
Before.
After.
USB - Firewire Port Modification:
If you use the metal chassis from a SCPH-50xxx PS2 you need to bend a few tabs on the USB port area.
Before.
NOTE: Power supplies from SCPH-50xxx PS2s will not work with SCPH-3xxxx motherboards due to the power connector of SCPH-50xxx PS2s being in a slightly different position.
Connector:
If you use the chassis from a SCPH-50xxx you need to cut off the piece of metal along the edge of the chassis as it will collide with the power connector plastic on 300xx - 390xx PS2 motherboards.
Before.
After.
If you use the metal chassis from a SCPH-50xxx PS2 but the power supply from a SCPH-300xx R - SCPH-390xx you need to replace the posts it sits on. Use 4x 3mm brass standoffs, 3x Male to Female 20mm long and 1x Female to Female 38.5mm long.
The yellow circle is a different length spacer. You can do either one of two things here:
- If you want to avoid drilling part you can use a ...mm female to female standoff and use a 3mm screw to screw through the fan mount plastic, go through the metal chassis and screw into the power supply standoff.
- You can drill for a more sturdy power supply mount. To do so you need to prepare the area before you can install the spacer. To do this take a ...mm drill bit and carefully drill the screws thread part of the chassis away. The 3mm hole that goes all of the way through the chassis should be left untouched.
Before.
After.
USB Firewire Sticker:
If you are using the bottom housing from a SCPH-50xxx PS2 you will need to remove the USB port sticker or cut a hole in it for the Firewire port on SCPH-300xx R - SCPH-390xx PS2s.
Power Supply Post:
NOTE: To use a SCPH-50xxx bottom housing you must remove the plastic standoff below where the power supply would be located because it will collide with the power supply.
Before.
BUILDING UP A SCPH-50xxx, GH-023 to GH-029 MOTHERBOARD PS2
BUTTONS / IR SENSOR
NOTE: IR remote function will be unavailable if you proceed with the listed disc drive swap.
SCPH-50xxx PS2s use a 12 pin 0.5mm pitch connector and SCPH-300xx R - SCPH-390xx PS2s use a 7 pin 1mm pitch connector. I am currently designing custom PCBs to convert the different connectors to the other kind. I will be selling these if there is anyone interested.
Pic to be added.
CHASSIS
Top Heat Sink Chassis Swap:
Bottom Chassis Modification:
HOUSING
Bottom Housing Modification:


